Wednesday, December 13, 2017

Food

 Food 
You either "live to eat" or "eat to live."  I'd read about hikers who cooked great meals, dehydrated them and vacuum sealed them for rehydration and reheating on the trail. I didn't have time for that given that I decided on March 3 to hike and had a start date of March 27.  That put me in the "eat to live" category.  I did have enough time to dehydrate apples and pears.

How much?
For each day I packed 1.5 to 1.75 lb of food into a plastic bag.  That won't replenish all the calories expended from walking 8-12 hours a day, but will hold you over until you can get to a trail town where you can catch up, eating everything you can.

Each day's first meal was 1 cup granola with some powdered milk all in one ziplock bag, that I'd dump into a bowl, add water and eat.  After that, I'd munch all day:  Clif Bars, Trail mixes.  I dipped a spoon into a jar of peanut butter every 30 minutes.  A bottle of olive oil would supply a mouthful of energy, also every 30 min.

 I bought olive oil at trail towns--the best leakproof container for that is a 500 ml water bottle.  I had some Annie's organic gum drops, but before long I disliked them for having too much sugar.  The nut mixes from Costco were a favorite from beginning to end.  Chocolate or yogurt chips in trail mixes became a gooey mess with the least amount of warmth, even buried in my backpack, thankfully confined to their ziplock bags. 

Stove or stoveless?

Plenty of better hikers/writers than I have written about this choice.  Google that.

   I went stoveless because I wanted to reduce the weight I carried and because I thought alcohol stoves were prohibited.  Regulations require that stoves have a shut off mechanism, which the failure proof alcohol stoves, having no moving parts, didn't.  I didn't want to take a heavier, more complex canister stove.  The key to taking an alcohol stove, that I should have remembered is that mine could be instantly snuffed out by covering it with an inverted can.
     FYI:  My saucepan, pot cozy, BIC lighter, spoon, alcohol stove, windscreen and fuel bottle weighs 9.5 oz.  Fuel for the stove would have been about 4-6 oz. The leakproof Nalgene container I bought to mix my dinners weighed 5 oz.

Stove
It's not really cooking.  It's reheating.  Cooking is a burden no long trail hiker needs on the trail.  One hot meal a day was what I had planned for.  Hiking the Wonderland Trail in 2013, I learned that more than that ate up 30-45 minutes.

Don't do as I did:  change my dinner plan from cook to stoveless without changing the menu.  I changed.  I decided I'd eat the same food intended for cooking by soaking the food for a few hours before dinner.  Food like instant rice needs heat for the water to soften.  Instant brown rice doesn't soften without heat--white rice is a stretch..

 
Stoveless
     A stoveless menu would have had different, and better, choices for dinner, perhaps like tortilla or pita wraps, more Idahoan potato packages, sausage, cheese, salami, pepperoni, tuna and salmon packs, nut butters, etc.
  Many stoveless choices will have water mixed in.
  Hummus mix is a good pick--sources abound.
  Idahoan potatoes hydrated well and tasted good cold.
  Pasta sides and rice sides did not sit well with me for my stoveless menu.
     Dried bean mixes, (pictured above) from a food co-op or maybe Whole Foods do rehydrate well without heat.

Coffee
I'm not a hostage to coffee.  If you're a coffee fanatic, you'll pay the penalty in pack weight, carrying grounds or beans, a French press, grinder, etc.  I like Trader Joe's Instant or Starbucks Via packs. The Via products are good and even do well cold, though I prefer it hot, if at all.
Tuesday, December 12, 2017

The JacksRBetter Sierra Stealth top quilt review

JacksRBetter (JRB) Sierra Stealth quilt

Rating:  ◙ ◙ ◙ ◙   4/5

Gear reviews aren't a major part of prepping for a long hike.  This item can do double service as quilt and serape, though this quilt is just the thinner brother of the quilt (the Sierra Sniveller) that better suits the Pacific Crest Trail.  Read on.

First, a little quilt talk, I've been using a quilt for camping since 2013.  Sleeping bags are OK, if one doesn't care that the insulation compressed by one's body has no value or that when turning, the face opening requires one to turn the entire bag, which exposes flattened insulation to cold air that you will feel.  After a few minutes it would regain its loft and insulate, but why bother carrying insulation that's useless underneath me?  Most quilts have insulation above and on each side of you plus a little on the bottom and don't have a hood.  That means
  1. you need to learn the trick of turning without turning the quilt.  If you're sleeping on the ground, the sides of the quilt can be joined by cord or webbing under you or under the sleeping pad, making that a non issue.   
  2. the separate head insulation you wear won't affect the quilt.  
  3. you wear the head insulation around camp, making this another dual use item in your pack.
Most quilts also have no zipper, making them lighter still.

BAFFLES.  If you made a quilt, you could sew two sheets of fabric together on three sides, fill it with down insulation, and stitch it closed.  To keep the down from shifting, you might sew a line of stitches every six inches, which would work for moderate temperatures, but for colder nights you'll feel the cold along the stitching lines.  To fix that you'd sew in walls (also known as baffles) between those stitch lines, which would let the insulation fill in between the stitch lines and eliminate those gaps. 

The baffle orientation.  You can tell by the stitching how the maker oriented the baffles.  Stitches that run from left to right allow down to shift from above you to the left and right edges of your quilt or sleeping bag.  Stitches that run from head to toe allow down to shift along that channel.

Now, to the JacksRBetter (JRB) Sierra Stealth.  The JacksRBetter Sierra Stealth down insulated quilt has a temperature rating of 40-45 deg F.  Construction is sewn through meaning it has no baffles.  The stitching runs from left to right which means down insulation can shift to the edges of the quilt so you'll need to shake it to get the insulation back to the middle.  The JRB Sierra Stealth has six loops for securing it around a ground pad.  You provide the cord or webbing to join the loops.  I'm unsure whether it is better to link the sides of the quilt under the sleeping pad or under just your body.  The top corners have a snap which suggests to me that however you link the sides of the quilt below those corners, it might work better to join the corners behind your neck.  I haven't experimented with this much.

One can order the quilt with two options for the foot box, where your feet go: with the foot box sewn, or with the foot box cord locked and velcroed, allowing one to use the quilt flat on warmer nights or as a bedspread at home.  I ordered option 2.
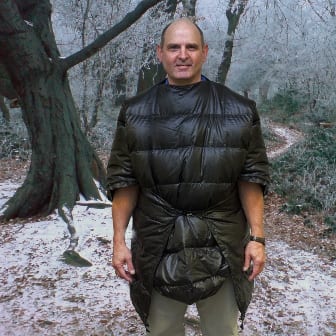
   This quilt is wearable--you separate a velcro-closed opening in the middle, stick your head through the hole and voila, you have a puffy, "short-sleeved" jacket/serape like this:
Wearing your quilt as a jacket does not make your hairline recede.
I bought this quilt for use at home sleeping on my sofa in the winter, when I have the thermostat turned down to 64 deg F.  Is it warm enough to use for summer camping with my hammock in the Sierra Nevada (6,000-12,000')? 

Being of average height, I have the regular length.  It's long enough to side sleep and wrap the top over my head, leaving only my face exposed.  Because I turn during a night and also sleep on my back, I wear a separate hood (picture below).  Hot sleepers can get away with a wool or fleece cap.  The drawstring around the quilt's top end allows you to cinch the quilt around your neck to reduce heat loss from the torso.


When stretching the quilt from left to right (below) I noticed that neither the outside nor the inside fabric hangs loose, meaning that the inside shell is the same size as the outside shell, potentially allowing elbows or knees to stick into the insulation making cold spots more likely when I have the quilt wrapped around me.  By the same token, the inner shell is more likely to fill gaps, so maybe it's a wash.


Two questions I had:

  1. Does it work as-is with a 20" wide Neoair sleeping mattress?  With a width of 52" I'd have about 10-12" of quilt on each side of me.  The edges don't float up but they rest lightly on the floor or ground and can shift about enough to permit heat loss.  While back sleeping, my arms fall off the pad and rest on the ground--I'd more likely link the edges under me on a cold night to keep my arms off the ground. Warm air not trapped in insulation will more likely carry heat away.  
  2. How well does it work with the edges linked?     Quite well with the loops linked under the pad, though the quilt doesn't have enough weight to drape over me--requiring me to heat air space between my sides, the floor and the quilt.  I felt warm more quickly with the loops linked above the pad.  Also, linking the edges above the pad, the quilt kept my arms from rolling to the ground.
The JacksRBetter Sierra Stealth comes with a zippered vinyl storage bag and a stuff sack sewn from waterproof fabric--the seams aren't sealed.  It has a roll top that closes at the outlet with velcro.  After rolling the top down, I can wrap the attached 3/4" webbing around the sack and and lock it to a pair of D rings--it's more cumbersome than a more appropriately sized stuff sack with a draw string.  When I stuffed it, I always felt like I could have done better.

Positives:
  1. Warm, light.  Mine weighs 460 gm (16.25 oz)  I'll not likely use the stuff sack that weighs 40 gm (1 3/8 oz), as the quilt can go into the same drybag with my hammock and underquilt.  
  2. You can buy it stuffed with Activ-Dry down for $10 more.  The Activ-Dry treatment keeps the down drier when wet and lets it dry faster when it does get wet.
  3. usable as a short sleeve parka.  Maybe leave your jacket home?  The velcro can attach to a JRB made hood, but I didn't find it necessary to have my home sewn hood attach to the quilt. I didn't find the velcro uncomfortable even on the skin of my neck ( see #2 below) 
  4. soft comfortable fabric.
  5. Many of JRB's products are in stock!  Other makers need a lead time of 3-6 weeks.
Negatives:
  1. It is black outside and in,--I can't tell which side has the foot pocket.  I often found myself trying to shove my feet in when the pocket was on the other side.   (the quilts rated for colder temperatures come in bicolors--pale green and black)  Two other quilt makers, Hammock gear and www.enlightenedequipment.com let buyers choose different colors.
  2. JRB forms the foot pocket using Velcro and a snap.  The edge of the Velcro closure on which my ankles often rested, irritated me if barelegged or caught on clothing.  I took out the Velcro, replacing them with Kam snaps.  And because JRB's label came off with the Velcro, I resewed the label to the head end of the quilt on the outside, enabling me to easily ID the side with the foot pocket (issue #1 above).  This change reduced the weight minimally (7 gm) 
  3. The velcro at the head/neck hole is scratchy too, but nowhere near enough to remove it, likely because it rests very lightly on my upper legs.  I also didn't have any interest in replacing the velcro with a zipper or other attachment.  It didn't irritate me in use as a jacket.  JRB sells a hood that has matching Velcro, helping keep it off your neck, but it's $60.
  4. To cinch the draw cord at the head end, it has two huge cord locks, both behind my neck, when I've snapped the corners together for warmth.  Most sleeping bags have the cord lock at the shoulder opposite the zipper--having to reach behind my neck for two separate cords on the JRB quilt:  awkward.  When I have the quilt at chest height a the snapped quilt puts the cordlocks in the middle of my back.  
  5. You can buy it stuffed with Activ-Dry down for $10 more.  This should not be optional.  They should just charge the extra $10 and make none without Activ-Dry.  It might save someone's life.
Wish list:  
  1. A couple of pull loops to separate the head opening for use as a serape.  It's just a little fussy.
I wouldn't use the Sierra Stealth on the Pacific Crest Trail for a thru hike, because nights on trail do get to 20 degrees F in the high Sierra in June.  It would be fine for section hikes during warm season hiking in July and August.  Another JRB quilt, the Sierra Sniveller (25-30 deg F, 24 oz) or the Hudson River (21 oz) would be more suitable--though both are rated to 25 degF, their 2.5" of insulation may take you to 20 degF.  I used a 20 degree Zpacks quilt (21 oz) before I knew about JRB--I used the Zpacks every night on the trail.  The Zpacks quilt has a zipper on the back side--it joins the insulated sides of the quilt under you.

Disclaimer:  I bought this quilt for personal use and received no additional item of value from the maker.

Addendum.  March 5, 2018.  I sewed the foot box bottom shut because even when cinched tight, it still left a small opening for cold air to enter.  I moved the adjustment for the neck from the corners (back of the neck) to the middle, where I could easily reach it.